
Installation guide
October 2016 (v. 1.3)
![]()
EPR20161011_EN_5
© 2016 PIXEL-TECH. All rights reserved.
TABLE OF CONTENTS
1. The Event Print Server Software installation
2. Starting the Event Print Server Software
4. The Event Print Server Software starting window
5. Test connection with the Event Print Server Software
1. The Event Print Server Software installation
1.1 Insert the installation CD into your computer. If the installation starts automatically go to step 1.2. If the installation doesn’t start automatically, locate the EventPrintServer_Setup.exe file on the CD and run it by double-clicking on it with the left mouse button. (NOTE! If you bought a version with the Serial Number or want to use Event Print as a DEMO version, download the EventPrintServer_Setup.exe file from our website or from a direct link delivered after purchase, and run it by double-clicking on it with the left mouse button).
1.2 Both in the course of the installation and during its work, the Software requires elevation of privileges to the level of the Administrator. In the window displayed during installation and the subsequent start-up of the Software, select [Yes].
1.3 In the next steps of the installation, follow the instructions on the screen to install the Event Print Server Software correctly.
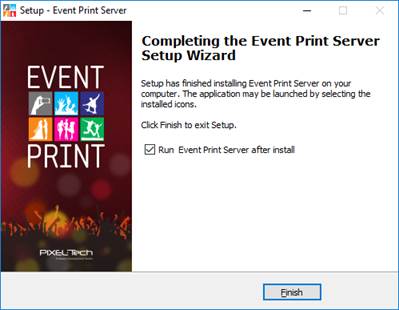
1.4 In the last step of the installation, choose whether the Event Print Server Software should be run immediately after installation or not. NOTE! If you bought a Software version with the USB Dongle Key it is necessary to plug in the USB Dongle Key now (see >> 2.1).
2. Starting the Event Print Server Software
2.1 If you bought a Software version with the USB Dongle Key, please follow steps below:
a) To run the Software in its full mode, plug the USB Dongle Key - supplied with the Software - into your computer's USB port. NOTE! For its full operation, the Event Print Server Software requires a plugged-in Dongle Key - you can’t use the Software in the full mode without a Dongle Key.
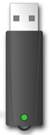
b) After plugging the USB Dongle Key into your computer, make sure that the green LED on it is lighting continuously - if so, start the Event Print Server Software by double clicking with the left mouse button on the Software icon.
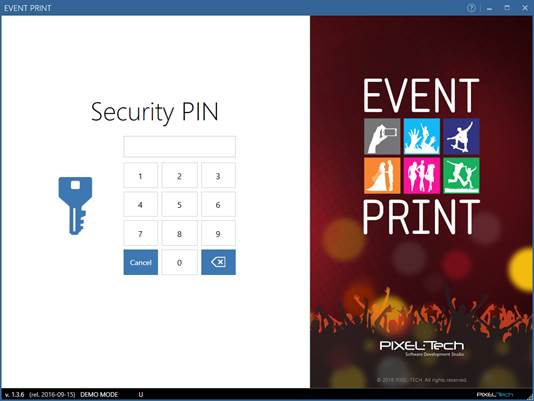
c) After starting the Software, a new window appears in which you must enter the Security PIN. NOTE! The default Security PIN for the Event Print Server Software is 1234. This PIN can be changed whilst working later with the Software. Providing the correct PIN will automatically launch the Software.
d) The Event Print Server Software will start. NOTE! If the USB Dongle Key isn’t plugged into the computer, the Event Print Server Software will run in DEMO MODE.

2.2 If you bought a Software’s version with the Serial Number, after installation Event Print will run as a DEMO mode. Please activate it using a Serial Number delivered after purchase.
3. Connecting the Router
3.1 If you bought the Event Print Software together with the Event Print router (supplied as a package), please follow steps below:
a) Turn on the Event Print Router, supplied with the Software.
b) Connect the Event Print Router with the PC via the LAN port.

c) Go to >> 3.3
3.2 If you bought a version with the Serial Number or you want to use Event Print as a DEMO version, please open an appropriate manual:
a) ASUS RT-N12+ router – go to: http://go.pixel-tech.eu?EventPrintasusrtn12
b) TP-Link TL-WR841N router – go to: http://go.pixel-tech.eu?EventPrinttplinkwr841n
c) Any router (general manual) – go to: http://go.pixel-tech.eu?EventPrintgeneralrouter
and then go to >> 3.3
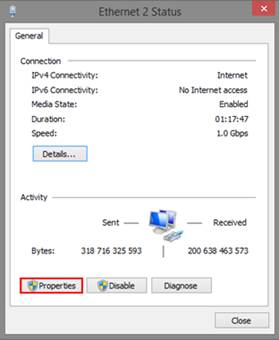
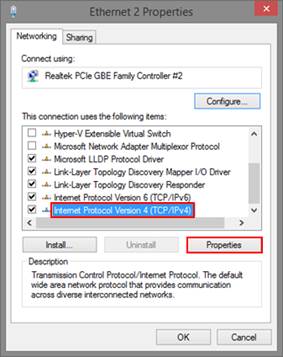
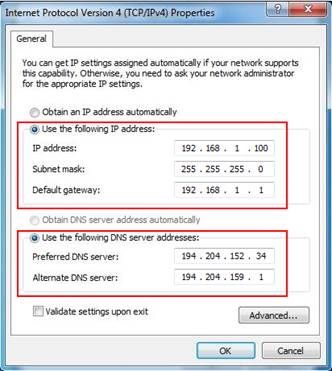
3.3 Change the computer's network card address – Internet Protocol Version 4 (TCP/IPv4) - to the following values:
· IP address: 192.168.1.100
· Subnet mask: 255.255.255.0
· Default Gateway: 192.168.1.1
· Preferred DNS server: 194.204.152.34
· Alternate DNS server: 194.204.159.1
Step 1:
Step 2:
Step 3:
4. The Event Print Server Software starting window
4.1
To start the Uploading Photos Service, please
press the  button in the Upload
status section.
button in the Upload
status section.
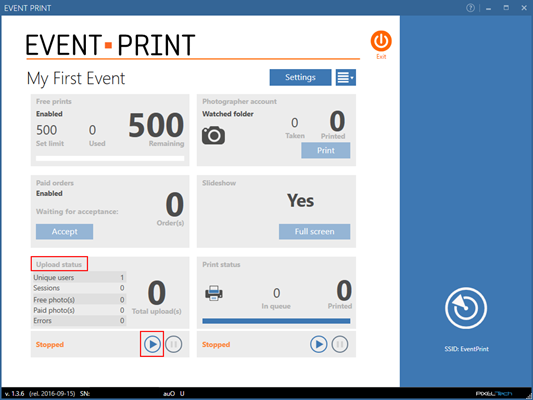
NOTE! When the Event Print Server Software is running and you start the Uploading Photos Service and press the [Full screen] button, the Software will show a slideshow mode and lock the screen. To exit the slideshow mode, you need to click with the left mouse button in the upper left corner of the Software and enter the PIN.
4.2 To start the Photos Printing Service, set up the printer in the Software’s Settings, in the Event tab.
4.2.1 Select your printer from the available printer list.

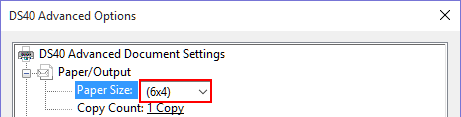
4.2.2 Select a format that you want to use for printing via the Event Print Server Software. To choose a format, click on the [Properties] button:

and pick the format from the driver window.
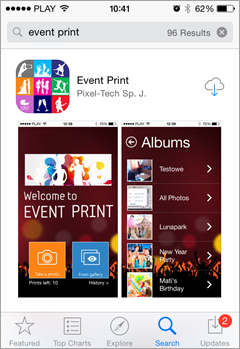
5. Test connection with the Event Print Server Software
5.1 After connecting the Event Print Router, your connection with the Event Print Server Software should be tested. Download on any mobile device (phone/smartphone/tablet) a free Event Print App and try to send some photos.
5.2 To install the free Event Print application use the following QR code (scan it with a scanner on your mobile device).

5.3 You can also enter your mobile store (App Store, Google Play or Windows Phone Store) on your phone/smartphone/tablet and find a free Event Print application and install it.
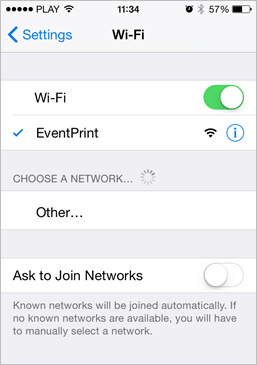
5.4 Connect to the local “EventPrint” Wi-Fi network (accept it despite the lack of access to the Internet).
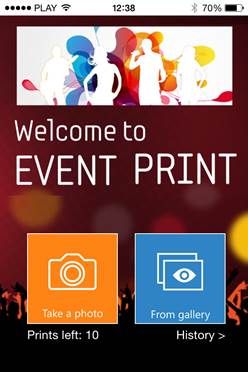
5.5 Start the Event Print App. If everything is OK you should see the welcome screen of the Event Print App.
6. Event support
6.1 To serve the event, make a detailed configuration in the Software’s Settings (the details are placed in the document: “User manual”).
In case of questions please contact with:
Trademarks and names used in this document are property of respective companies. Microsoft and Windows are either registered trademarks or trademarks of Microsoft Corporation in the United States and/or other countries.
PIXEL-TECH Company does not guarantee that all information included in this document is correct.
The information presented here may contain technical inaccuracy or errors. The changes and corrections are made periodically and will be included in the next editions. PIXEL-TECH Company may do changes and improvements of its products or Software without notice. PIXEL-TECH company may use or send the information from the users in any form considered as suitable, without any obligation to the users.
© Copyright 2016 PIXEL-TECH. All rights reserved.
All the contents of this document, including the layout, graphics and text are copyrighted. No part of this publication may be reproduced, stored in a retrieval system, or transmitted in any form or by any means — electronic, mechanical, photocopying, scanning, or otherwise — without a prior written permission of the PIXEL-TECH company.