
Installation guide
and user manual
August 2019 (v. 2.7)

MPK20190829_EN_4
© 2019 PIXEL-TECH. All rights reserved.
Table of Contents
1. Mobile Photo Kiosk – service description
2. Installation and run of Mobile Photo Kiosk Manager
3. The Mobile Photo Kiosk Manager starting window
4. Sales channels configuration
6.1 Window of a Product with options
6.2 Window of a Product without options
7. Additional options in category and product configuration
8. Working with the mobile application
8.1 Installation and first launch of the mobile application
9. Mobile Photo Kiosk Downloader
1. Mobile Photo Kiosk – service description
Mobile Photo Kiosk consists of three elements:
· Mobile Photo Kiosk Manager – a software dedicated to manage a mobile shop. Using it you can provide address data of your Photo Lab and set up photo products available for clients (e.g. prints in various formats, gadgets, etc.).
· Mobile Photo Kiosk application installed on smartphones/tablets – available to download free of charge for your clients on Android and iOS platforms. With the help of this application, the final client places orders for photo products in your Photo Lab.
· Mobile Photo Kiosk Downloader – designed to download orders (coming from the mobile application) from the Pixel-Tech server to your computer. NOTE! Only available when using the FTP server from Pixel-Tech.
2. Installation and run of Mobile Photo Kiosk Manager
To install the Manager software, run MPKManager_Full.exe file by double-clicking on it with the left mouse button and follow the instructions displayed. NOTE! Both, in the course of installation and its work, the Manager requires elevation of privileges to the level of Administrator. In the window displayed while installation and later work select [Yes].
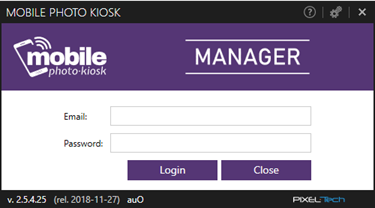
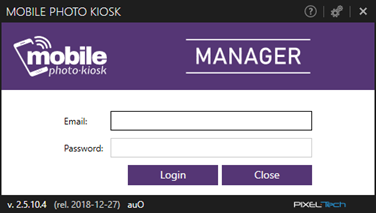
After successful installation the login window will appear.
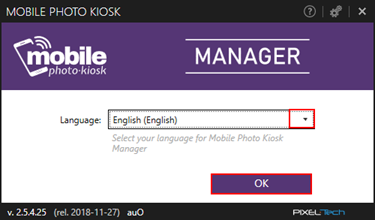
Press the configuration
button available in the upper right corner of the window ![]() , select the target language of the software from the
drop-down list and confirm it with the [OK] button.
, select the target language of the software from the
drop-down list and confirm it with the [OK] button.
Enter an email address and a password set at the registration level of your shop at Pixel-Tech and press the [Login] button.
Manager window of your mobile shop will be displayed. NOTE! To get to know all shop possibilities easily, its initial configuration (including available photo products) has already been made. You can make changes and confirm it with the [Publish] button.
3. The Mobile Photo Kiosk Manager starting window
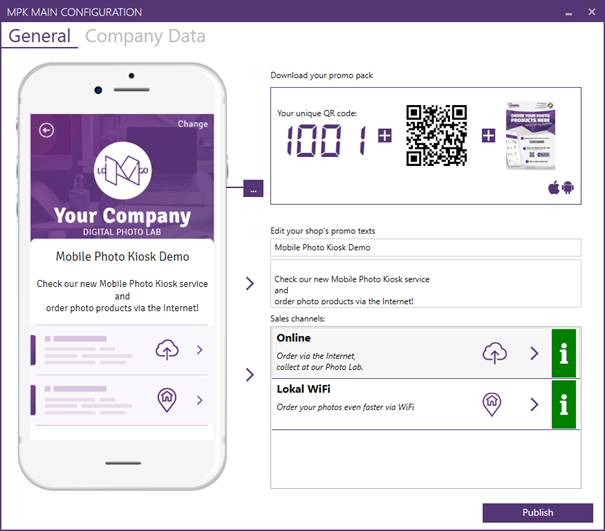
The Manager software allows you to create a fully functional shop, later available in the mobile application.
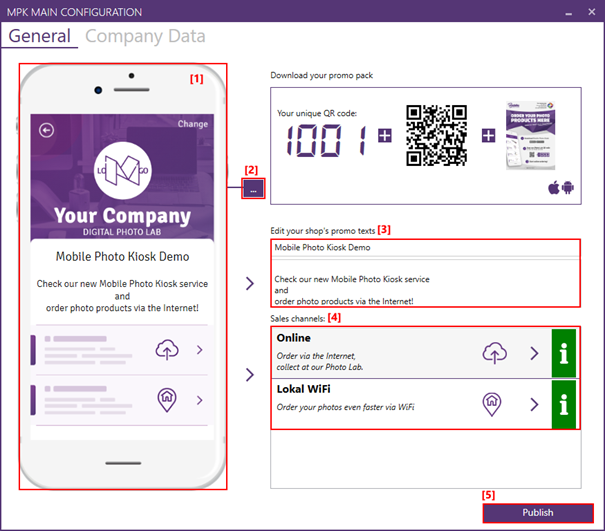
In the upper part of the window there are two tabs: General and Company data.

General tab allows you to: [1] preview the appearance of the application on a client’s smartphone (with immediate refreshing of logo or promo texts changes that are made by you), [2] change your logo available in the mobile application, [3] change your promo texts available in the mobile application, and [4] access to sales channels for which you paid (in the example below Online and Local WiFi). Confirmation of changes takes place each time the [Publish] button [5] is pressed.
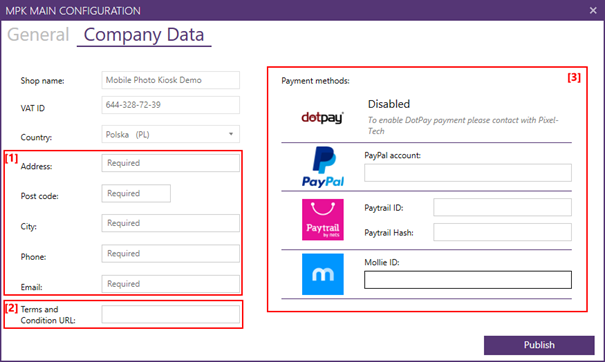
The Company data tab allows you to: [1] enter address data of a shop (these data are not displayed in the mobile application), [2] show location of your shop Terms and Conditions and [3] set up payment channels. Confirmation of any changes takes place each time the [Publish] button is pressed.
Please start working with the Mobile Photo Kiosk Manager from updating your logo and promo texts (if necessary).


4. Sales channels configuration
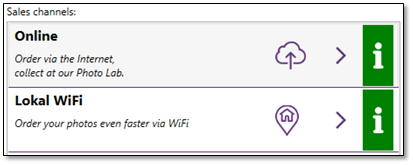
Sales channels are opened according to your order. Their names and descriptions will be visible in the mobile application. NOTE! Editing a Sales Channel in the Mobile Photo Kiosk Manager is possible by double-clicking on it with the left mouse button.
Mobile Photo Kiosk service allows you to collect orders via two Sales channels types:
· Local WiFi (using a local WiFi of a Photo Lab) – a client must be physically present in a Photo Lab, an order goes directly to the computer disk that is visible in a local network. NOTE! Due to the need to register the order on the Pixel-Tech server, locally available WiFi network must provide access to the Internet (a file transfer will not take place, so high bandwidth is not required);
· The Internet (using the Internet) – a client places an order from anywhere. The order goes to the Pixel-Tech’s server via the Internet.
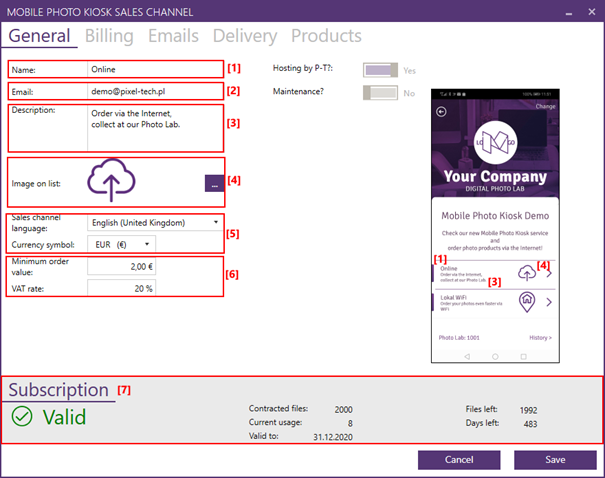
To edit Sales channel, double-click on it with the left mouse button. A new window with five tabs will appear: General, Billing, Emails, Delivery and Products.

In the General tab you are able to: [1] change a Sales channel name (e.g. Online, by the Internet, Buy Now); [2] set up an email address where you will receive info about a new order; [3] enter a short description of a Sales channel and [4] an icon in the mobile application; [5] determine the language (in which the messages in the application will be displayed) and currency of the shop; [6] set up minimum order value (a function description below) and VAT rate for your products, [7] get information about the current state of the Subscription (information about expiry date of the Mobile Photo Kiosk account, contracted and used files).
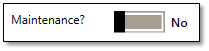
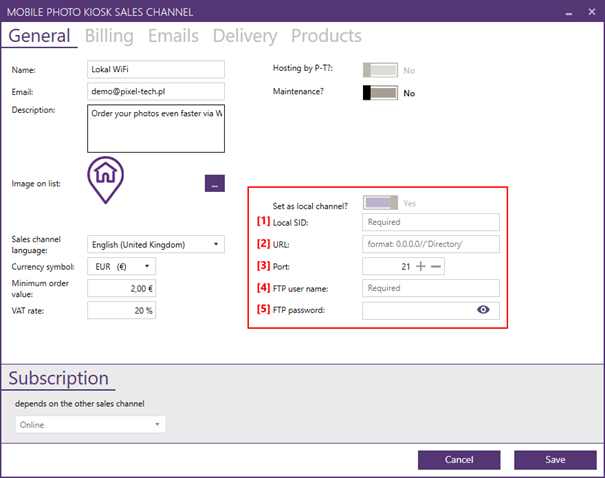
In the case of a local (using WiFi) Sales channel until full configuration is finished (providing the necessary data), an option Maintenance is turned on. Placing orders through the application is not possible. To turn it off, switch the button to the [No].
Configure a local Sales channel (the [Local ?] button in the [Yes] position) by providing: [1] a SID name of your network (in the example: Photo Lab); [2] URL in the form of a local IP address, then a „/” sign and necessarily the name of a folder (in the example: 10.50.20.120/Orders); [3] port, where FTP service is available; [4] user name (an access to target location); [5] passwords (an access to target location). NOTE! To operate the WiFi Sales channel, it is also necessary to configure some additional software (e.g. FileZilla) that will act like an FTP server. Alternatively, Pixel-Tech offers a Router with an FTP server that is configured to operate with the WiFi local channel.
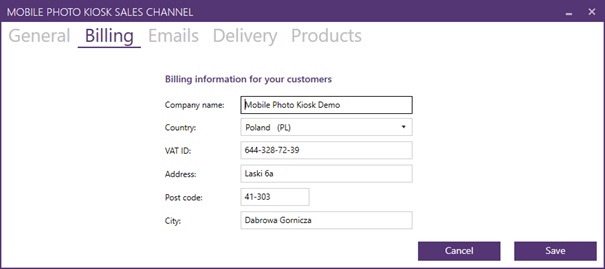
In the Billing tab you can specify your company data which will be visible in the mobile application.
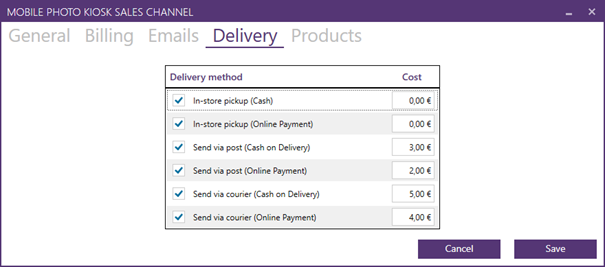
In the Delivery tab it is possible to turn them on/off and to determine their costs. NOTE! „Online Payment” methods require configuration of at least one online payment method (in the main MPK Manager Window -> Company data tab).
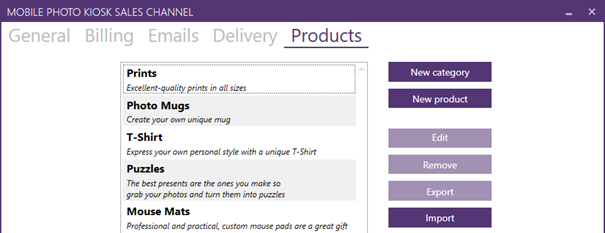
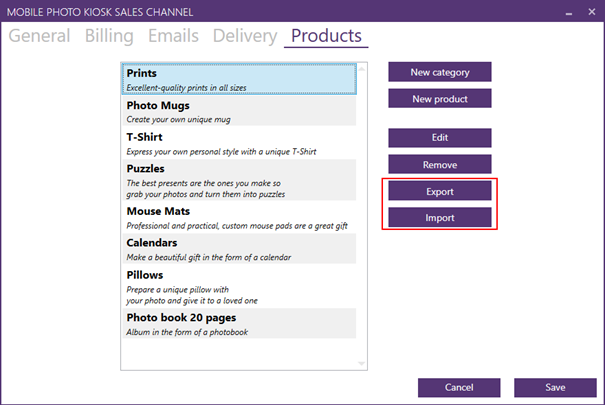
In the Products tab you may configure products which will be available for the clients who use the mobile application. To make it quick and easy, in the shop you can find pre-configured, default photo products. You can:
· edit products - double-click on a product to open it (or select it with the left mouse button and us the [Edit] button on the right hand side of the window),
· delete products – select the product by clicking on it with the left mouse button and press the [Delete] button on the right side of the window,
· export and import products – to avoid having to enter the same descriptions for subsequent introduced products, you can export the finished product to a file (select it and press the [Export] button), and then import it (press the [Import] button) - the product will be added at the bottom of the product list,
· add new products – click the [New category] or the [New product] button on the right hand side of the window,
· change the order of products on the list - by dragging them to the selected position with the left mouse button pressed
NOTE! Available configuration options of Products are presented in chapters 5 and 6.
5. Category configuration
Mobile Photo Kiosk allows you to add two category types:
· Multi-product – within this category it is possible to define independent products or additional subcategories;
· Product option – products defined within this category are treated as options.
To add a Category, press the [New category] button.

In a new window choose a Category
type, enter necessary descriptions, add a Category icon by clicking
the ![]() button, and save
changes.
button, and save
changes.
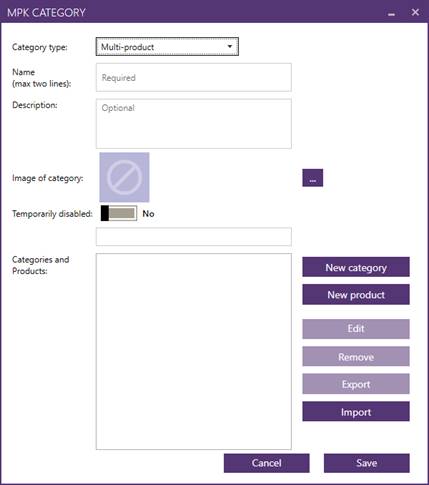
Then add a subgroup (select the [New Group] button) or a final product (select the [New Product] button).
Sample configuration schemes are presented below.
Multi-product category
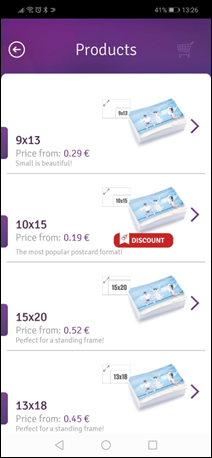
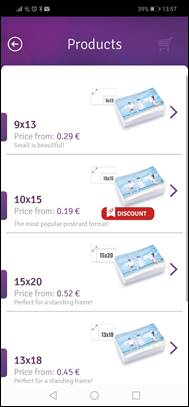
The example below shows the already configured adding/editing a new category window and its mapping in the mobile application.
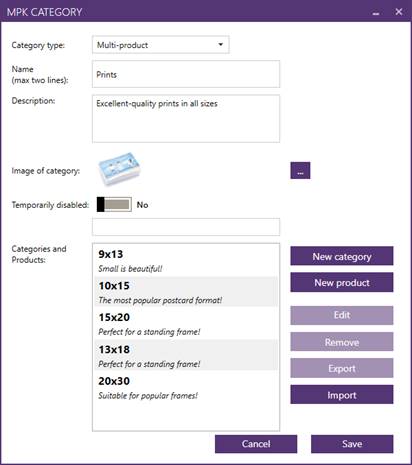
As you can see the Multi-product category type under the name Prints has been added. Inside this category you can find ready products: 9x13, 10x15, 13x18, 15x20 and 20x30.
Options have been added for each product (NOTE! How to configure the product options is presented in chapter 6.3).

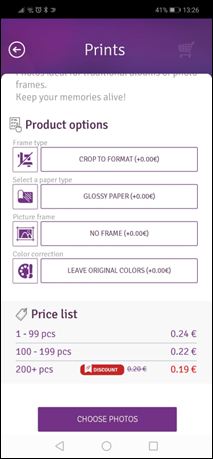
The options configured for the product are visible in the mobile application as follows:
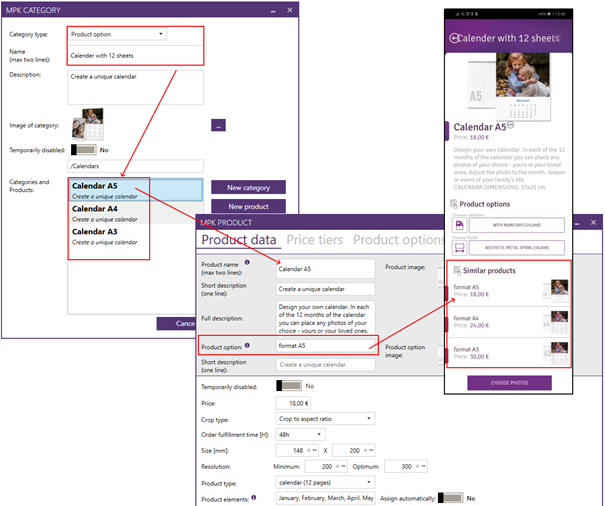
Product option category
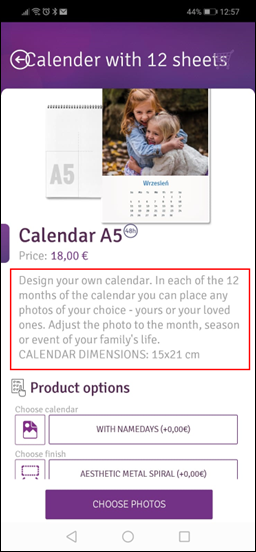
The example below shows the already configured adding/editing a new category window and its mapping in the mobile application. As you can see first the Multi-product category type under the name Calendars has been added. Inside this category one ready product under the name Photo Desk Calendar and three Multi-product type sub-categories under names: Year Planner, Calendar with 12 sheets, Calendar with 13 sheets have been added. Then following products were created as variants of the Calendar with 12 sheets product: Calendar A5, Calendar A4 and Calendar A3.
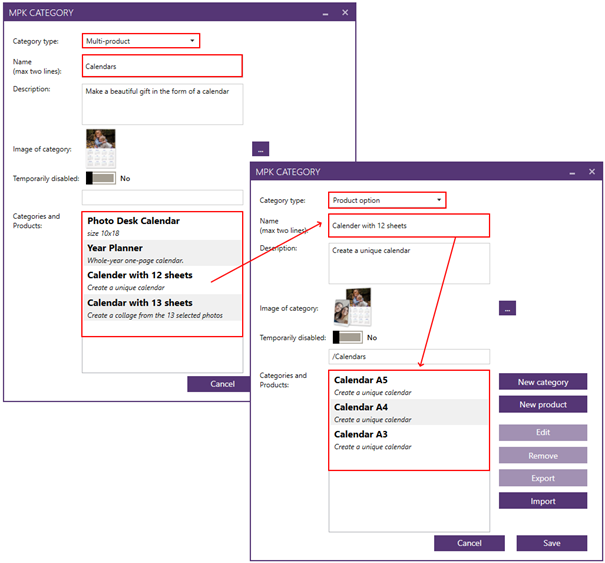
In the mobile app, this scheme is visible as follows:

The available options for variants A5, A4 and A3 have been configured using the options tab (NOTE! How to configure the product options is presented in chapter 6.3).
6. Product configuration
The window for adding/editing a new Product looks differently, depending on whether the product has options or not.
6.1 Window of a Product with options
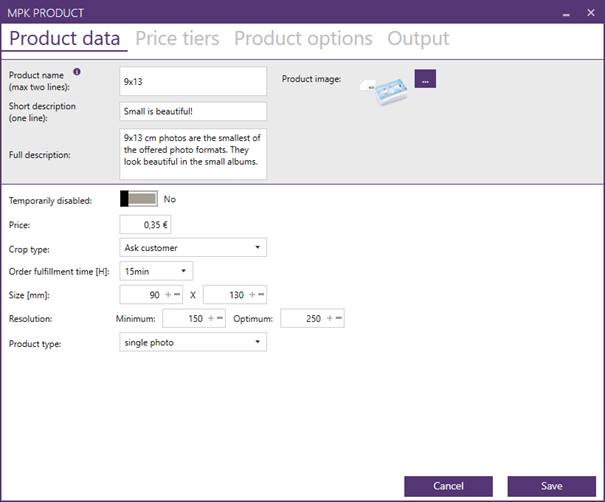
The window for adding/editing a new Product (with available product options) consists of four tabs: Product Data, Price tiers, Product options, Output.
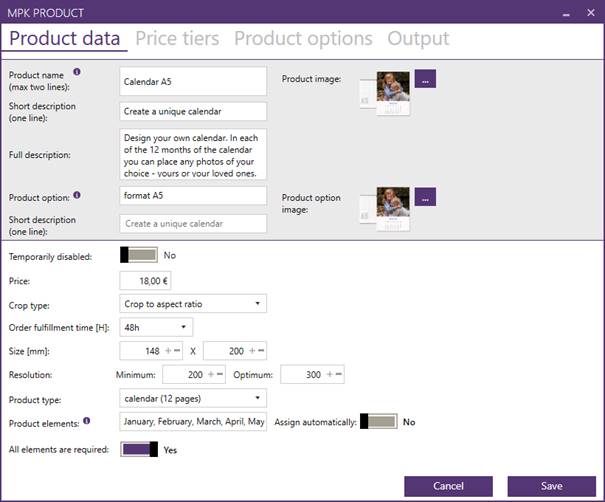
In the Product data tab pay attention to:
· Full description – it is displayed in the mobile application with the final product (regardless whether it contains options or not). It is important that this description accurately describes the product available for sale, and is quite detailed.
· Product option – it is displayed with the final product concerned, in the form of a scrolling list. Options should precisely reflect all features of the ordered product (e.g. in the case of the Calendar with 12 pages – its size).
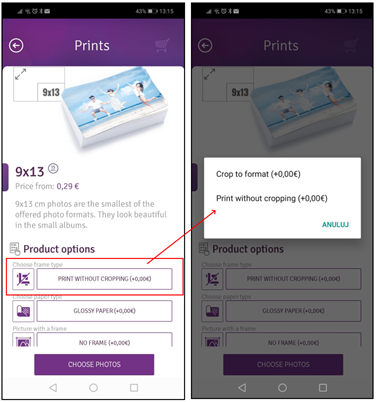
· Crop type – You can decide how to inform a customer about the cropping of the photos he sends.
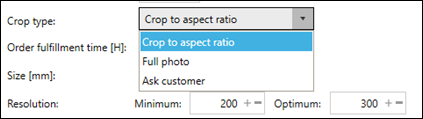
Crop to aspect ratio – at the stage of choosing photos from the gallery, the application will inform a client that his photo will be cropped. NOTE! The actual frame is not displayed or the frame cannot be moved - the frame is displayed centrally in the image.
Full photo – at the stage of choosing photos from the gallery, the application will show that the client's photo will be printed in full.
Ask customer – choosing this option will automatically add the Choose cropping type option in the Product options tab (NOTE! How to configure the product options is presented in chapter 6.3). In the mobile application, the customer will be able to decide whether his photo should be cropped or not.
· Product type – Mobile Photo Kiosk gives you an opportunity to order products which require loading more than one photo.
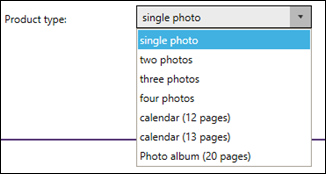
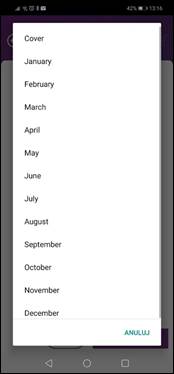
While choosing a multi-photo product you should specify the elements of the product (e.g. months for a calendar).

After selecting a photo in the mobile application, a list will appear where a customer should indicate which element the selected photo should be.
NOTE! You may automatically assign sequentially selected files to subsequent elements by checking [Assign automatically] field. Moreover, you may not demand selecting the maximum number of photos by unchecking [All elements required] option.
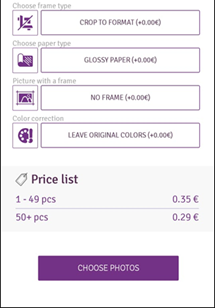
In the Price tiers tab it is possible to set price gradation depending on the number of ordered products. Mobile Photo Kiosk will automatically change the price, if a client exceeds a given threshold value of an order. Moreover, it is possible to set a promo price.
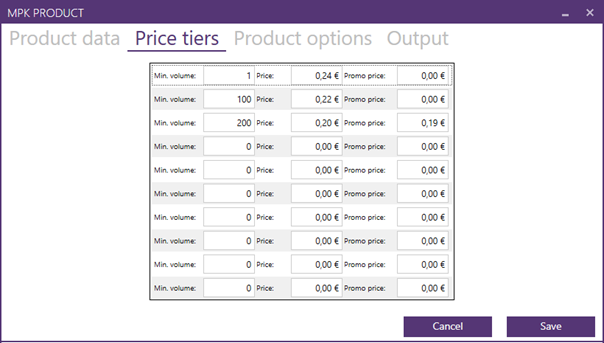
For example, for orders exceeding 200 pcs, 0,19 € will be the applicable price, which will be displayed in the mobile application.
The Product options tab is discussed in chapter 6.3.
The Output tab gives you the option of creating a default name of directories and files. The standard layout looks as follows:
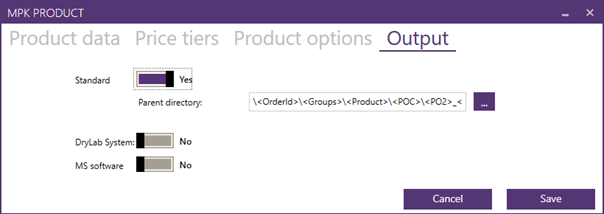
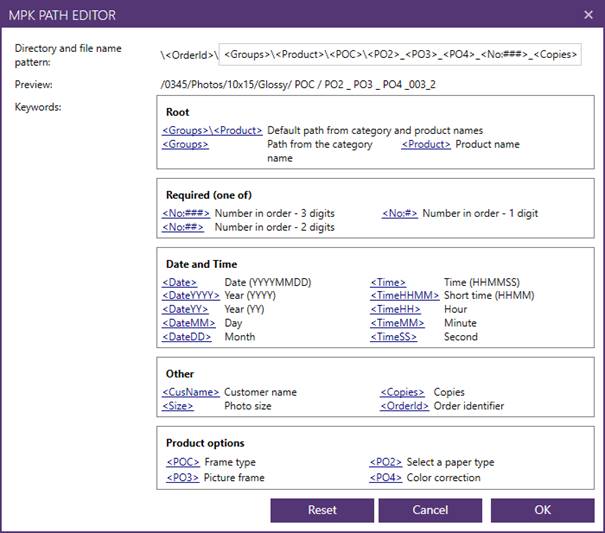
After pressing the ![]() button, a new window will be displayed, where you can
define your own pattern of a name of a directory and a file. NOTE! The order
number (OrderID) is a fixed and unchangeable value.
button, a new window will be displayed, where you can
define your own pattern of a name of a directory and a file. NOTE! The order
number (OrderID) is a fixed and unchangeable value.
6.2 Window of a Product without options
The window for adding/editing a new Product (without available product options) consists of four tabs: Product Data, Price tiers, Product options, Output.
The edition of price tiers and the structure of a target path of directories and files is done in the same way, as for the product with options.
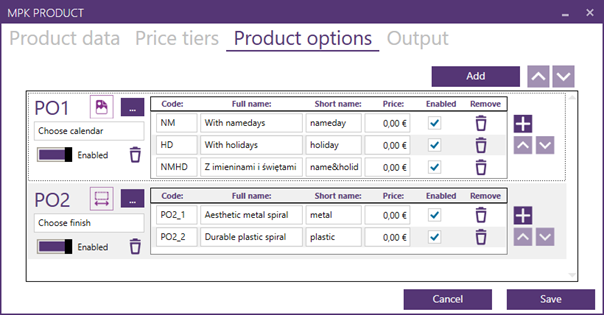
6.3 Product options
NOTE! An example method of configuring product options can be seen in the instructional video available here: https://youtu.be/6I2QNAqGC9s
To configure options for a product, go to the Products options tab:

If for a configured product the Ask customer cropping type has been selected (in the Product data tab), then the first item is already available on the list of options – it’s the Frame type.
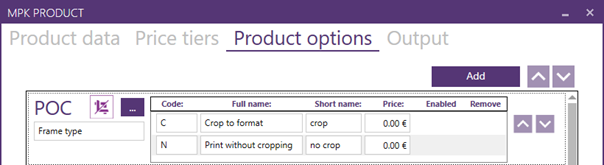
To add a new option for the product, press the [Add] button. An empty line of the new option will be added to the end of the list.
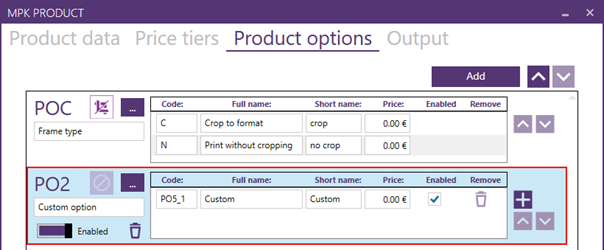
Adding further items within the options
is done by pressing the ![]() button.
button.
To complete the configuration:
·
select
an icon describing the option by pressing the ![]() button,
button,
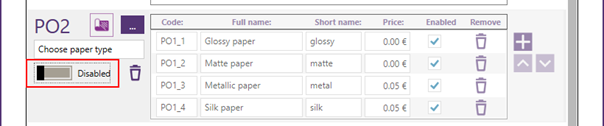
· provide a full name of the option and its abbreviation, code and price (if the option is not to provide additional payment to the standard product price, the price remains 0 €).
The options that you have configured might look like this:
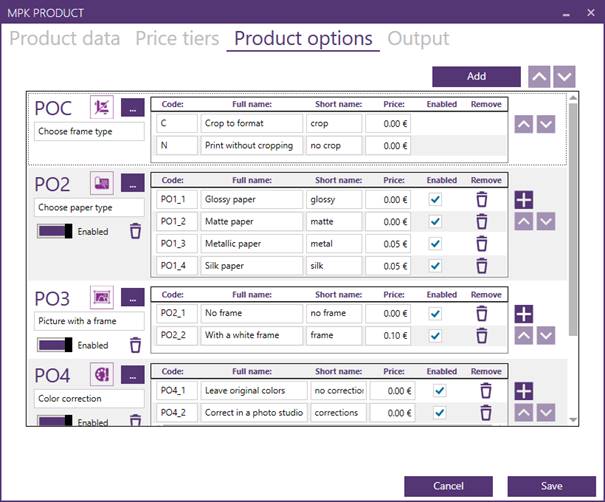
You can change the position of a
given option on the list using the ![]() buttons. To remove an option, use the
buttons. To remove an option, use the![]() button. In addition, option
availability may be temporarily disabled. To disable the option temporarily,
move the slider to the Disabled position.
button. In addition, option
availability may be temporarily disabled. To disable the option temporarily,
move the slider to the Disabled position.
7. Additional options in category and product configuration
During your Shop configuration, you can copy created product categories and individual products. To do so, use the [Export] and [Import] buttons located on the right hand side of the Products tab window.
To import a given item, select it by clicking on it with the left mouse button, then press the [Export] button and save the created .xml file under any name on your computer. Then press the [Import] button and browse the previously saved .xml file. The copied item will be added to the end of the list. NOTE! Moving categories/products on the list is done by pressing and holding the left mouse button on the category/product and simultaneously dragging it to the target position.
You have the option of temporarily disabling a product or a category of products from the offer. To do this, set the Temporarily disabled slider to [Yes].
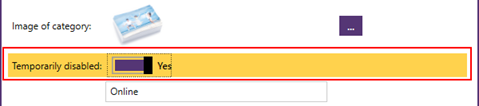
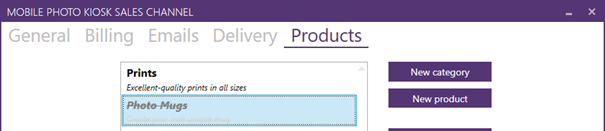
The product/category will not be removed from the configuration, only hidden for users of the mobile application. In the MPK Manager this product/category will be crossed out in the list.
In the MPK Manager you have the option of using embedded or custom graphics (icons) that characterize products and categories. Clicking the button

will open a window with public graphics (Public tab) and the option to load your own (Custom tab).

8. Working with the mobile application
8.1 Installation and first launch of the mobile application
Installation of the mobile app on the client’s smartphone/tablet and its connection with your Photo Lab may be carried out in two ways.
Option number I:
The final client scans your unique QR code (the one you shared on the website, a leaflet, a poster, etc.). Sample QR code leading to Pixel-Tech:

Then, the client gets transferred to his operator’s store (App Store or Google Play), where he downloads and installs the free mobile application called Mobile Photo Kiosk.
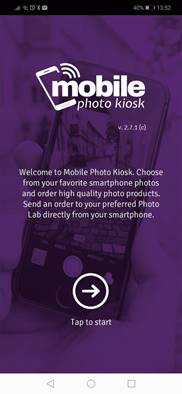
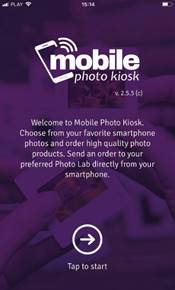
After starting the application, press the [Tap to start] button.
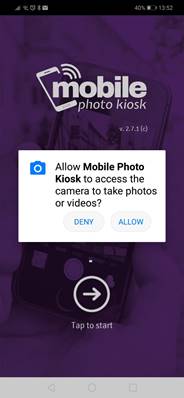
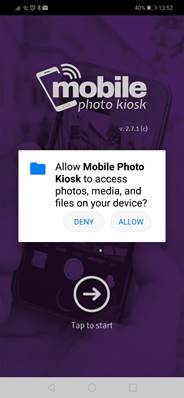
In the next step, the application will ask you to give it access rights to the camera and photos - press the [Allow] button.
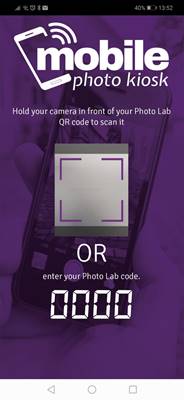
Then, associate the application with the photographer's Shop – to do so, the customer must either re-scan your unique QR Code or enter your Photo Lab Code (provided by you on the website, leaflet, poster, etc.).
Option number II:
The final client on his smartphone/tablet enters the store of his operator (App Store or Google Play), finds the free mobile application called Mobile Photo Kiosk, downloads and installs it. In the next step, he scans your unique QR code or enters your Photo Lab code (the one you shared on the website, a leaflet, a poster, etc.), which links the mobile application to your Photo Lab.
From now on, orders placed by the final client will go directly to you.
8.2 Placing orders
Following screenshots show the process of placing orders by the final client from the moment of starting the Mobile Photo Kiosk application on his smartphone/tablet.
· Start of the mobile application – [Tap to start] button.
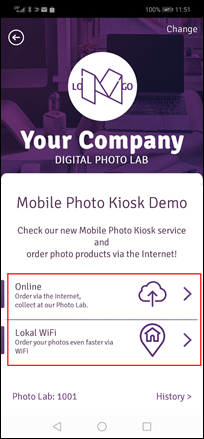
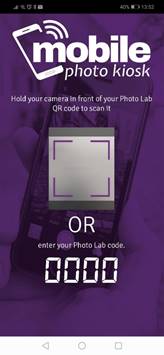
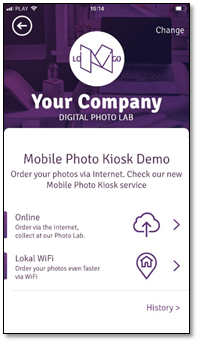
· Sales channel selection – the Internet/Local WiFi depending on the type of ordered service. The following buttons are also available here: [Change] – to scan a QR code again and connect another
Photo Lab, [History] – to display the history of placed orders and the Photo Lab number to which the application is currently logged in.
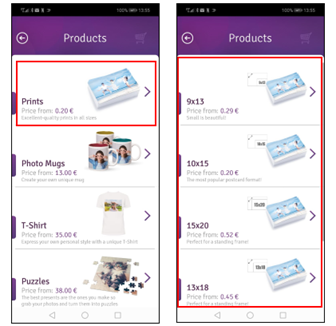
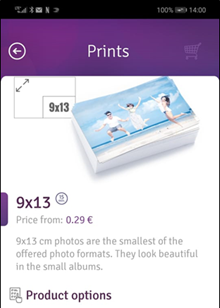
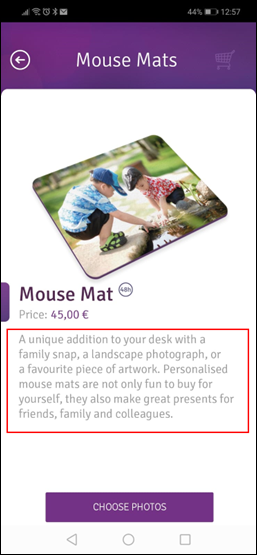
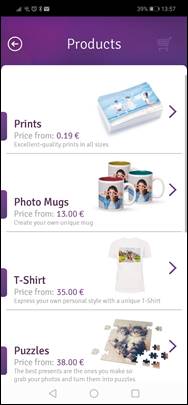
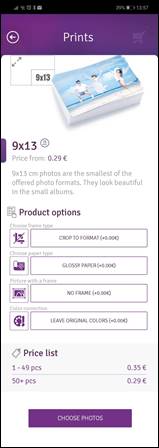
· Product selection – in the example below, from the Category Photos -> 9x13 product was selected.
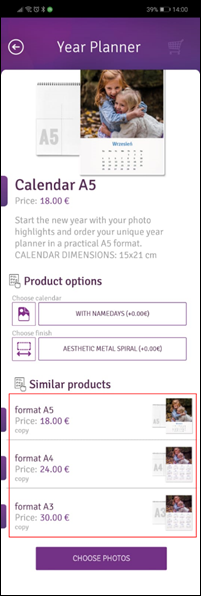
NOTE! In the case of product with options, by default the first of the available options on the list is marked – in this case, Calendar A5. A client may change this option by scrolling down the list and selecting required option from the Similar products.
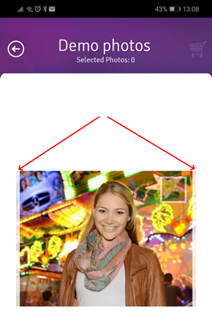
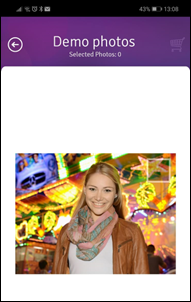
· Selecting the photo album and choosing photos – adding them to the basket. To select a photo, select the square in its upper right corner.
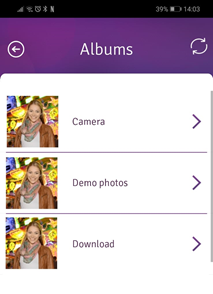
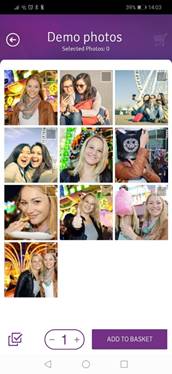
Photos can be viewed in a full screen mode. To view the full screen mode, touch a photo. Viewing next/previous photo is done to the right/left using standard gestures on the smartphone.

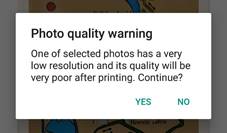
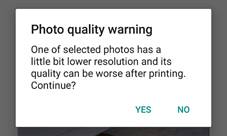
Photos in the gallery that
have poor resolution are marked in their upper right corner with  or
or ![]() . Attempting to add them to the cart
will display one of two messages:
. Attempting to add them to the cart
will display one of two messages:
· Basket management – setting the number of individual products to an order, deleting products, adding new products, or closing and sending the order using the [Send] button.
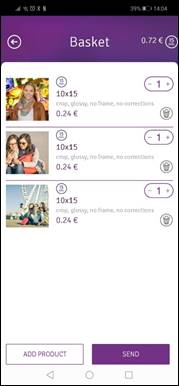
If the Shop defined a minimum order value and it has not been exceeded, an additional message may appear after pressing the [Send] button.
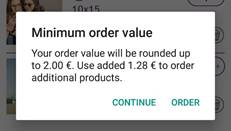
Pressing the [Continue] button will return to product selection, while pressing the [Order] button will align the order amount to the minimum value and allow the order to be finalized.
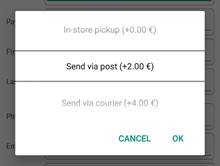
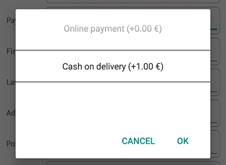
· Order summary - providing data, accepting Terms and Conditions, selection of payment and delivery method.
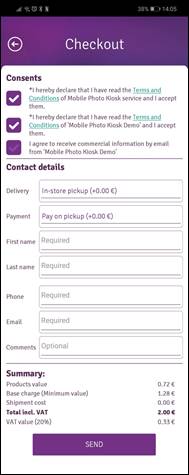
To change a delivery method and/or a payment method, click on an item - in both cases a scrollable list will appear, from which you must make a selection.
· Sending an order to your Photo Lab.

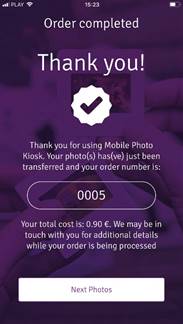
· Showing an order confirmation – the order number.
9. Mobile Photo Kiosk Downloader
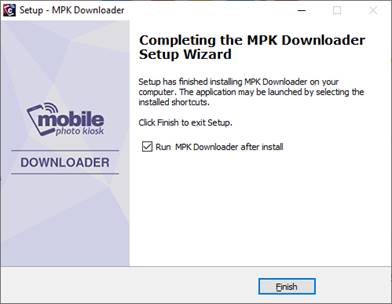
To install and run the Mobile Photo Kiosk Downloader, run the MPKDownloader_Full.exe file by double-clicking on it with the left mouse button.
In the next steps of the installation follow the instructions on the screen to install the Mobile Photo Kiosk Downloader correctly. In the last window of installation press the [Finish] button.
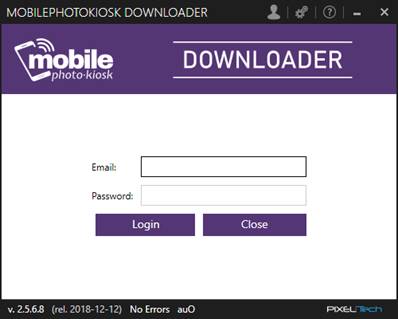
The login window will be displayed. Provide your email and password which was set while registering your shop in Pixel-Tech and press the [Login] button.
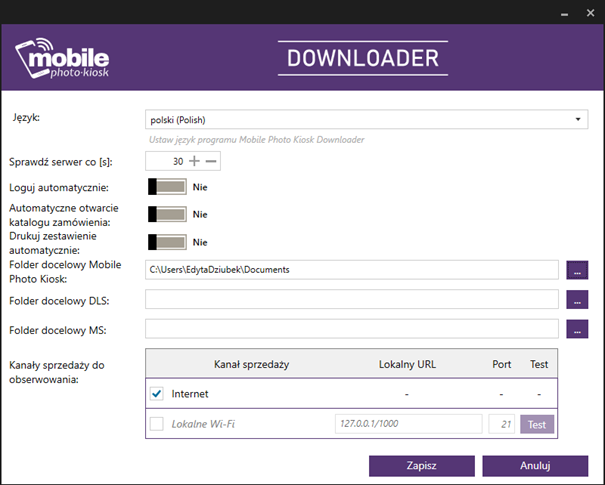
During the first run of the software, the configuration window will appear. Enter the destination path where order will be downloaded and the frequency of checking a server, then press the [Save] button.
In the window that appears press the [Start] button.
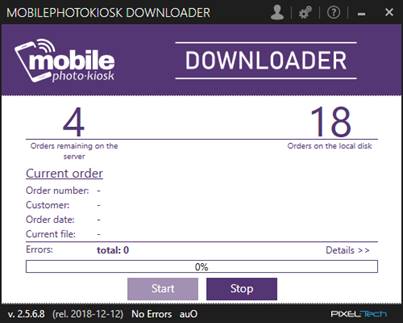
All orders made by clients will be automatically downloaded and placed in the folder indicated during configuration.
A shortcut of the software in the taskbar shows the number of orders downloaded to your computer.
![]()
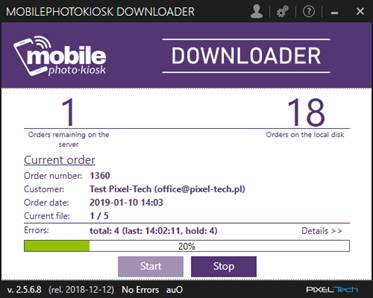
While downloading of a new order, on a shortcut of the software in the taskbar, a progress bar appears.
![]()
After downloading of a new order, a shortcut of the software flashes in yellow.

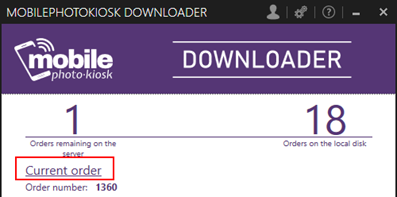
By opening the software from the taskbar and clicking [Current order] you can open the last order saved in the directory.
For each order a separate directory with an order number is created. In the directory, there is a .xml file with the order details and a separate directory with specification and client’s photos.
In case of questions please contact:
Trademarks and names used in this document are property of respective companies. Microsoft and Windows are either registered trademarks or trademarks of Microsoft Corporation in the United States and/or other countries.
PIXEL-TECH Company does not guarantee that all information included in this document is correct.
The information presented here may contain technical inaccuracy or errors. The changes and corrections are made periodically and will be included in the next editions. PIXEL-TECH Company may do changes and improvements of its products or Software without notice. PIXEL-TECH company may use or send the information from the users in any form considered as suitable, without any obligation to the users.
© Copyright 2019 PIXEL-TECH. All rights reserved.
All the contents of this document, including the layout, graphics and text are copyrighted. No part of this publication may be reproduced, stored in a retrieval system, or transmitted in any form or by any means — electronic, mechanical, photocopying, scanning, or otherwise — without a prior written permission of the PIXEL-TECH company.